

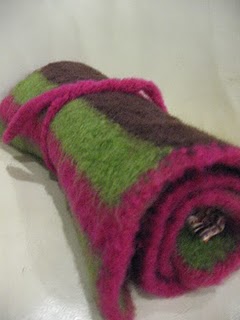
I really hate being some place and needing to change a diaper and not having a place to do it. So, I made this felted changing pad with pockets. It's so comfy, it's between 1/4 and 1/2 inches thick. It conveniently rolls up and ties. The pockets are truly optional. You could just stick a diaper in there and roll it up without the pockets.
Diaper Changing Pad
Yarn: 1 and a half skeins Patons Classic Wool or other suitable felting wool. If you want to do different colors, or stripes like I did, don't do what I did, use the same brand of wool so that it felts the same way.
Fabric: About a 1/3 of a yard of cute matching fabric in cotton or even better, flannel. And 1/4 of another coordinating fabric or you can use the same as the first fabric. (Be warned: I’m really bad about figuring out yardage, but I think that’s about right)
Pattern:
Foundation Row: Ch 49 Turn
Row 1: dc in 3rd ch from hook and in each chain across (48 dc). Turn.
Row 2: ch 2 (counts as first dc here and throughout) skip first dc and dc across, making sure to dc in your turning chain. Ch 2 turn.
Repeat Row 2 until you have 60 rows. Fasten and Weave. It will look pretty huge, but it will felt into shape.
You can change colors and do stripes if you want. Just remember to use the same brand wool. I didn't do that (I ran out of Patons and used Stitch Nation Full O'Sheep for the stripes and edging and it did not felt as tightly so mine came out a bit curly).
Edging: With contrasting yarn. Sl Stitch on edge. Sc around, 2 dc in the side of each dc, 3 sc in each corner. Fasten and weave.
Ties: Sl stitch in the middle of one of the short sides. Chain out about 20 inches. Turn and sc across. Don't fasten. Repeat in same spot for the second tie.
Felt that puppy.
Fabric lining and Pockets (OPTIONAL):
Measure the felted pad and cut your fabric about the same size.
Measure out to about 1/3 of the pad and cut 2 rectangles that measures the width of the pad by 1/3 of the length of the pad.
Fold under 1/4 inch and press the raw edge of a long side of the pockets and stitch (this will be the pocket opening). Repeat for the other pocket. Then fold down and press all the raw edges about 1/4 inch on the lining fabric and on the pockets, pin in place and top stitch together. Use a thread that will blend in because you are going to stitch the whole thing again to the pad.
Then place the pockets on the pad and pin. Use embroidery thread or thin yarn and stitch together. You can use any cute stitch you want like a blanket stitch. Voila! You got yourself one soft and cozy and useful travel diaper changing pad. Stuff it with a few dipeys and some wipes and roll it up and tie it and throw it in your purse. No need for the ginormous diaper bag. You’ve got everything you need.


Hello!
ReplyDeleteI'm new to felting and I love this pattern! Do you have the directions for felting?
Great job!
Much appreciated!
April
Thank you! To felt: Add your work to a small load of laundry with like colors. Set the washer to the smallest load size and the hottest water, add soap and let her rip. Sometimes the item will need to be felted twice to erase stitch definition. Reshape and air dry.
DeleteFYI Sometimes different colors of same brand of yarn will felt differently... has to do with interaction of dye/bleach with the fiber. You can 'block' some of it by stretching the smaller bits while it's still damp... but usually I have to close my eyes and get out my scissors :(
ReplyDelete